Hibiscus is a beautiful perennial flower. There are more than 1600 different varieties of hibiscus grown worldwide. It is a big family of thousands of colorful flower varieties. Choosing just one or two is never an option. If you love the big flower then you should grow one in a pot or backyard. Growing hibiscus is really very easy.
You can grow hibiscus by cutting, layering, grafting, or even with seeds. I personally prefer the cutting and layering options due to its success rate. Almost 8 out of 10 tries is always successfully grown. I can guarantee if you follow My steps then you will definitely grow your hibiscus successfully.
I will discuss the air layering method with all the necessary steps. Keep reading for details.
Check out my last post: 10 Beneficial Application of Plants in Human Society
How to Propagate Hibiscus by Air Layering?– Using a sharp knife or blade, Make two circular cuts 1 or 2-inch apart just below a branch or leaf node. Remove the bark between both cuts. Clean the area up to the cambium. The white center cambium of the stem should be visible. Coat the cambium with rooting hormone and a ball of soil & compost. Cover it with plastic wrap or aluminum foil. Tie both ends carefully. Leave the branch undisturbed for 30-45 days. The new Hibiscus plant will be ready in a maximum of 50 days.
What Is Air Layering?
Air layering is a vegetative method of propagation in plants. Technically it is a type of asexual reproduction in plants. Air layering is a very ancient technique of growing new plants.
Any plant with hardwood stem can be propagated with air layering. Plants such as hibiscus, Lime, Lemons, Oranges, are popularly grown with air layering techniques.
Air layering is especially effective in big plants with many branches. Simple layering is not useful in such cases due to fewer branches at the base of the plants.
Air layering is one of the best and easy methods to grow hibiscus. You can expect a 100% succusses rate with proper care.
When is the best time for air layering in Hibiscus plants?
The dormant season for the plants is the best time for air layering. Air layering in Hibiscus can be done in spring (February- April) and late summer (July-August-October).
Other than this you can grow hibiscus anytime at any season especially if the parent plant is in the shade or indoor.
Try the air layering method this monsoon for your hibiscus plant. Monsoon is the best time for growing hibiscus with cutting and air layering. 13 Tips for Gardening in Rainy Season: Monsoon Gardening
Materials required for air-layering?
Air layering is a pretty easy method of growing plants. You just need Proper knowledge and little tools. Here is the list of material you need for air layering.
- Sharp Knife of Blade. Check out on Amazon.
- Garden soil. Check out on Amazon.
- Compost (optional). Check out on Amazon.
- Sphagnum Moss (optional). Check out on Amazon.
- Plastic sheet or old polybag cuttings. Check out on Amazon
- Thread or strings.
- Rooting Hormone (optional). Check Price Here.
- paintbrush (optional).
You can also use old plastic cups, plastic containers, or small boxes for air layering. I have not listed the use of fungicide on the list. I would suggest sterilizing your tools before any use.
Keep reading for detailed uses.
Preparation for air-layering?
Air layering is easy, especially for experienced gardeners. If you are new in gardening or just air layering. Then don’t worry follow these steps to proceed. All these steps are tried and tested many times.
- Sterilize the knife using rubbing alcohol or sprit. You can also wash it with boiling water just for 2 minutes.
- Make small pieces of plastic sheet. The ideal size is 4-inch wide and 6 -inch long. I would suggest using a transparent plastic sheet for visibility. This is optional, any plastic sheet will work fine.
- If using Aluminium foil then sterilize this also. Be gentle with aluminum foil. Try not to make any hole in it, prevent any damage. The wrapping should be airtight. At least no water or insect should enter the wrap.
- Select a healthy parent hibiscus plant. The parent plant should be free from any fungus or diseases. It should also have at least 3-4 healthy branches.
- Spraying antifungal solutions before making any cut is commercially advised. The use of any contact fungicide will protect the plant from any fungal attack.
This is all you need to do before air layering. If you follow each of these steps carefully. then at least 90 % of your layerings will be successful.
How to grow Hibiscus by air-layering?
There are some variations in air layering on hibiscus. The simple method of air layering using compost and soil is the most popular way. Other than this using sphagnum moss, cocopeat, or coco coir is also gaining popularity.
Commercially the use of soil and compost is considered the best for air layering in hibiscus. Here I will discuss the commercial way of growing hibiscus. Don’t worry, this method very easy and cost-effective method. You can get 100s of new plants from each parent plant every year.
Start with selecting a healthy beach and follow the procedures carefully.
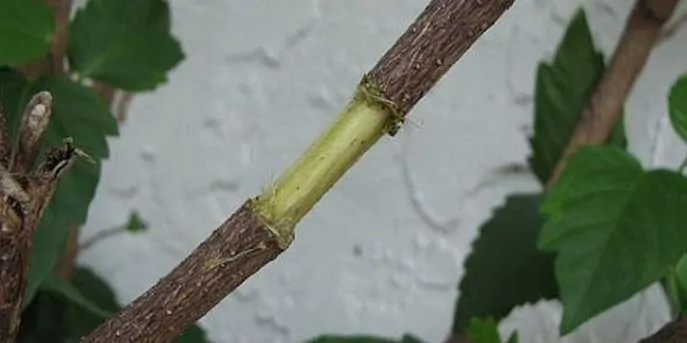
- Make two sharp round cuts just below a node or leaf. The cuts must be at least 1 -2inch apart.
- Remove the bark in between these two cuts. You can use a scalper or just your nails.
- Scratch the cambium using the knife. The cut portion should be clean and white. No skin connection should be left in the section. This is the most important step. If a single thread-like piece is left connected then the branch will not develop roots. Remove the bark completely.
- You can now apply a thin paste of rooting hormone over this cambium. This is an optional step. The roots will develop without any rooting hormone. This is only used to speed up the process. After applying let it dry for 4 to 5 minutes.
- During this time make a thick dough of 1 part garden soil and 1 part compost. If you don’t have any compost the just use the garden soil.
- Make a 2inch round ball of this dough. Break it in two halves.
- Paste it over the cambium and gently press. The dough to cover the node region completely. It should be soft and moist. You can also use moist sphagnum moss instead of soil. I prefer soil for this step.
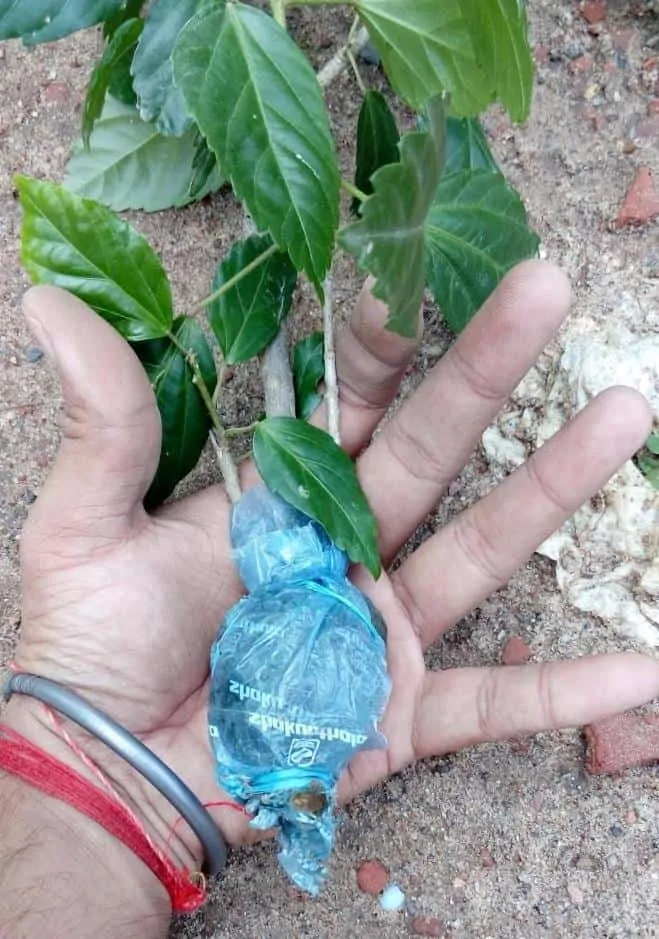
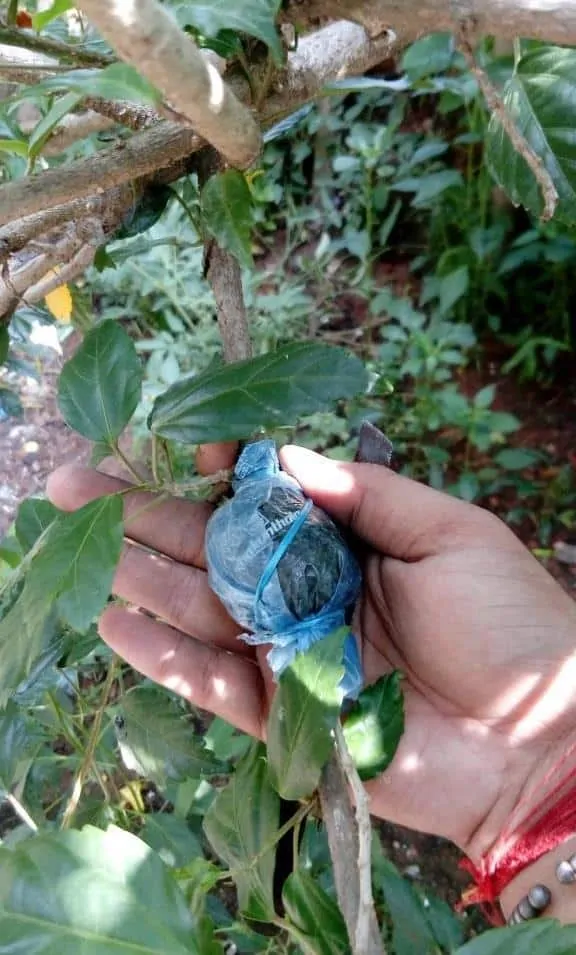
- Now gently wrap this dough with a plastic piece. Make it tight and firm. Don’t worry this will not harm your plants. You can also use aluminum foil for wrapping but it will increase your costing and efforts. A small plastic sheet is enough for this step.
- Tie both ends with string or thread. The knot should be tight enough to hold the dough inside the plastic. Follow the rule- The tighter the knot, the higher success rate you will get.
- Leave the branch with the knot as it is for the next 30 days. You need not water the joint. In fact, don’t water the branches during these days. You can water the plant if required.
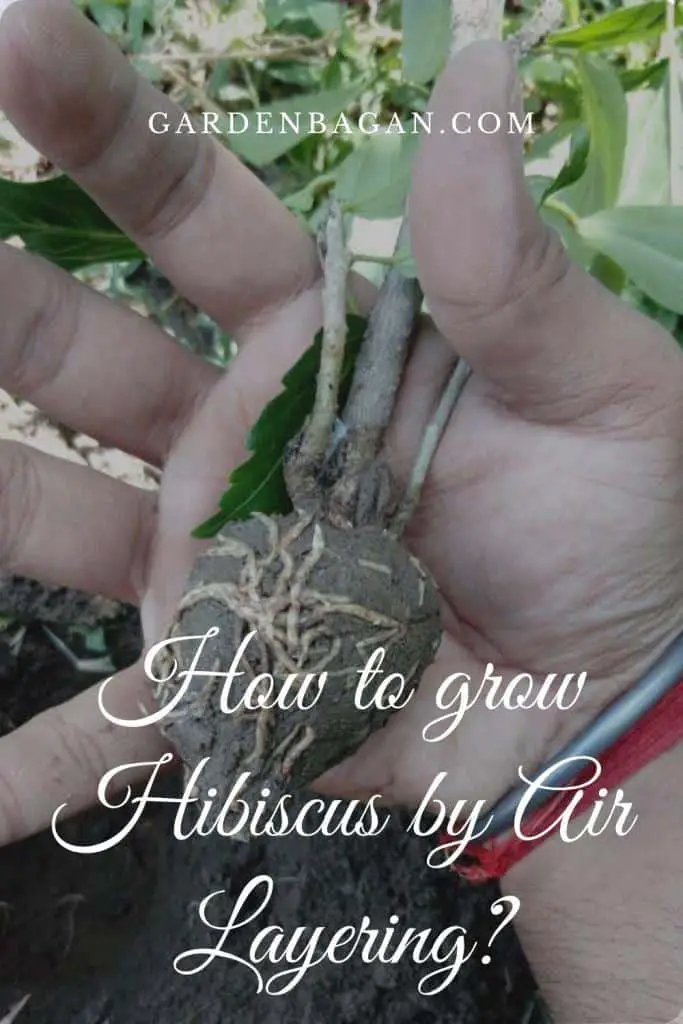
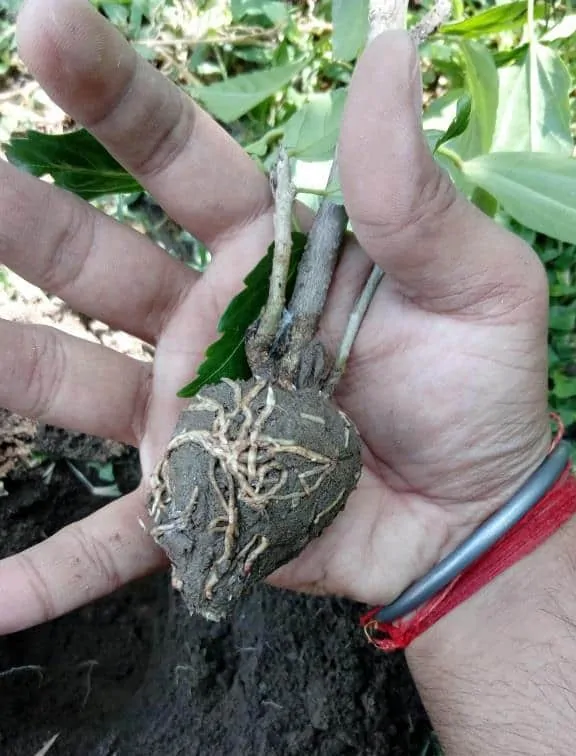
- New roots are visible after 30 to 40 days. You can Wait a few more days if unsure.
- After 45 days cut the branches just below the knots. Don’t open the knot at this time. The roots can break if you try to open and then cut the branch out of the plant. It was the first mistake I did so be careful.
- First, collect all the branches. Prepare a soil mix of 50% compost 30% garden soil 20% coco peat.
- Carefully open each knot one by one. Avoid disturbing the root ball.
- Fill half a pot with the prepared soil mix.
- Place the new plant in the middle. Gently fill the pot with the same soil mix and tap with hand to settle the soil.
- Water the pots thoroughly. Try to make the soil completely wet for the first time. After than water only when the soil gets completely dry.
- Place the pot in a semi-shade for 1 week or 10 days. After that, You can grow your hibiscus directly to your garden or in a bigger pot.
- Last but an important tip- Don’t get over-excited. A little hurry can destroy your month-long effort. So keep patience and wait for the correct time for cutting, reporting, and watering.
I can assure you that this is a 100% working method for propagating hibiscus. I have tried and tested these methods more than 6 times. So work out carefully for the best results.
If you are still having any problem then please let me know.
Special tips for air-layering in Hibiscus
There are some secret tips that I have learned with experience and from commercial gardeners.
Hibiscus loves a warm tropical climate. So Always grow hibiscus in the sunny spot of your garden. You will get more blooms in this area.
Don’t water your plant regularly. Yes, you heard this right it seems ridiculous but it works. If you keep the soil dry and let you plant droop a little. Then the plant will develop more roots in search of water It will make your plant strong and keep it healthy.
It doesn’t mean that you let it dry every day. Just keep the soil dry for 4-5 days and then water the plants. Apply water thoroughly and let it sinks completely.
Spray the air layered branches with an antifungal solution once every week. Also, spray a mixture of 11-11-11 NPK and Epsom salt to the leaves in every 15 days. These are optional steps but if you follow these carefully. Then you will get healthy hibiscus plants with frequent blooming.
Final Words
Growing hibiscus with air layering is always recommended. The plants you develop using the air layering method will bloom and grow faster than others. Sometimes air layering is considered tricky and difficult. If you follow everything carefully then you will definitely get lots of healthy plants. Still, if you think it is difficult then let me know. I will try to solve your problems.
Write your views and suggestion below in the comment box. Keep reading Keep gardening!